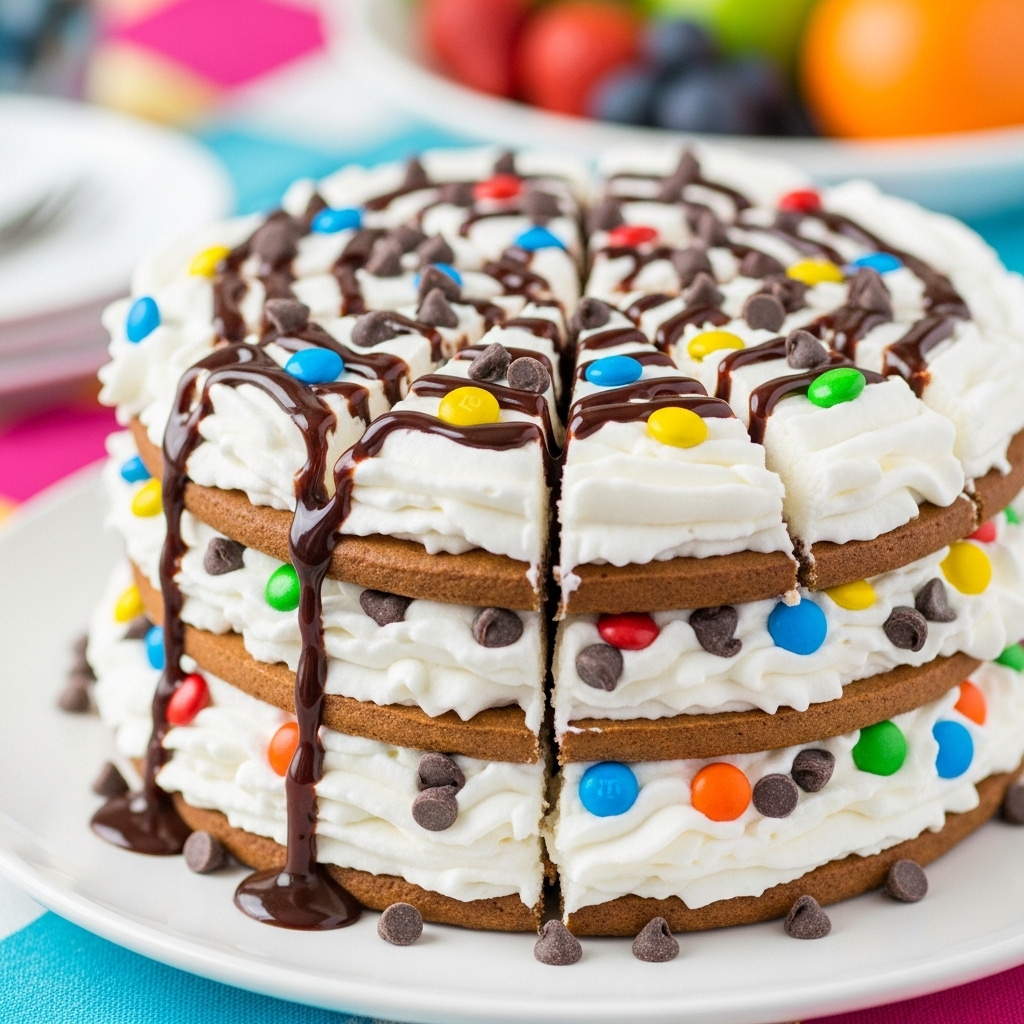
Ice Cream Sandwich Cake
Ice Cream Sandwich Cake Bliss (Layered Ice Cream Sandwich Dessert)
Get ready to dive into a dessert that’s as delightful as a summer day at the beach! Our Ice Cream Sandwich Cake is the ultimate sweet treat that combines layers of creamy ice cream sandwiches, fluffy whipped topping, and colorful candy into a towering masterpiece that will make your taste buds dance with joy. Perfect for summer gatherings, birthday parties, or just because—this cake is not only a feast for your eyes but also a flavor explosion that brings everyone together!
Why You’ll Love This Recipe
This Ice Cream Sandwich Cake is a showstopper that’s not only easy to make but also incredibly fun to enjoy. Here’s why it’ll become your new go-to dessert:
– Big, Bold Flavors: Each layer bursts with sweetness and delightful crunch, creating a symphony of taste.
– Crowd-Pleaser: Everyone, from kids to grandparents, will adore this nostalgic treat—a guaranteed hit at any gathering!
– Flexible & Fast: With just a handful of ingredients and minimal prep time, you’ll have a stunning dessert ready in no time.
– Make-Ahead Magic: Prepare it in advance and store it for busy days—just slice and serve when sweet cravings hit!

Ingredients You’ll Need
Before we jump into the fun part, let’s gather our magical ingredients. This Ice Cream Sandwich Cake is simple and relies on just a few key players that bring a delightful twist to your dessert game.
– 12 ice cream sandwiches (unwrapped)
– 16 ounces whipped topping (thawed)
– 1/2 cup miniature chocolate chips
– 3/4 cup mini M&M’s
– 1/3 cup fudge sauce
*Note: You’ll find the complete list of ingredients, along with their exact measurements, in the printable recipe card at the bottom of this post.*
Variations
The beauty of this Ice Cream Sandwich Cake is how easily you can customize it to suit your tastes or the occasion! Here are some scrumptious ideas:
– Go Gluten-Free: Swap traditional ice cream sandwiches for gluten-free varieties to keep everyone included!
– Add Extra Protein: Mix in some crushed protein bars or Greek yogurt for a healthier twist.
– Make it Spicier: Get adventurous by adding a sprinkle of cinnamon or chili powder to the whipped topping!
– Swap the Dressing: Try using different flavored whipped toppings like chocolate or strawberry for a fun twist.
– Cheese it Up: Add dollops of cream cheese frosting between layers for a rich flavor boost!
How to Make Ice Cream Sandwich Cake
Ready for a fun and straightforward journey into dessert-making? Let’s create this Ice Cream Sandwich Cake with these easy-to-follow steps!
Step 1: Set the Base
Start by placing 4 ice cream sandwiches in a row on a large serving plate, forming the foundation of your cake.
Step 2: Whipped Wonderland
Grab a piping bag fitted with a large star tip and pipe dollops of whipped topping generously over the ice cream sandwiches, creating a fluffy layer of joy.
Step 3: Sprinkle Some Magic
Sprinkle miniature chocolate chips and vibrant mini M&M’s over the whipped topping, adding bursts of flavor and fun colors!
Step 4: Firm it Up
Pop that creation into the freezer and let it firm up for about 30 minutes. It’s the perfect time to do a little happy dance!
Step 5: Layer It Up
Repeat the layering process with the remaining ice cream sandwiches, whipped topping, and candies. Make sure to freeze each layer until firm before proceeding to the next. We want this cake to stand strong and proud!
Step 6: Final Freeze
Once all layers are complete, freeze the entire cake until firm, which should take at least 1 hour.
Step 7: Drizzle and Serve
Take that beauty out of the freezer, drizzle fudge sauce over the top, slice into pieces, and serve up smiles!
Pro Tips for Making Ice Cream Sandwich Cake
– Chill Your Tools: For the fluffiest whipped topping, chill your mixing bowl and beaters before whipping.
– Layer Strategically: Ensure each layer is frozen firm before adding the next to prevent any melting mishaps.
– Use Room Temperature Whipped Topping: Make sure your whipped topping is at room temperature for easier piping.
– Experiment with Flavors: Don’t be afraid to mix and match your favorite candies or toppings to give your cake a personal twist!
How to Serve Ice Cream Sandwich Cake
Garnishes
Elevate your Ice Cream Sandwich Cake with gorgeous garnishes! Fresh berries, mint leaves, or a sprinkle of crushed nuts will add a pop of color and taste.
Side Dishes
Serve alongside refreshing fruit salad or a scoop of sherbet for a delightful balance of flavors.
Creative Ways to Present
Get fun and creative! Serve individual slices on colorful plates, or scoop out portions into clear cups for a festive touch at parties!
Make Ahead and Storage
Storing Leftovers
Store any leftovers in an airtight container in the freezer for up to one week. This cake is perfect for enjoying later!
Freezing
The Ice Cream Sandwich Cake freezes beautifully! It’s ideal for preparing ahead of time, just be sure to wrap it well to avoid freezer burn.
Reheating
No need to reheat this dessert—serve it cold straight from the freezer for the best experience!
FAQs
Can I use a different type of ice cream sandwich?
Absolutely! Feel free to choose your favorite flavors or brands to make this cake truly your own.
Is this recipe spicy?
Nope! This Ice Cream Sandwich Cake is sweet and creamy, with no heat involved unless you choose to add a spicy twist!
How do I make this gluten-free?
Simply use gluten-free ice cream sandwiches to keep this dessert safe for those with gluten sensitivities!
Can I prepare this in advance?
Yes! This cake is perfect for making ahead of time. Just store it in the freezer until you’re ready to serve.
Final Thoughts
This Ice Cream Sandwich Cake is more than just a dessert; it’s a celebration of flavors and fun, making it the highlight of your gatherings! With its easy preparation and customizable layers, you’ll impress your family and friends without breaking a sweat. So grab those ice cream sandwiches, unleash your inner pastry chef, and get ready to enjoy a slice of pure bliss! Happy baking! 🍦✨
Ice Cream Sandwich Cake

Indulge in the ultimate summer treat with this Ice Cream Sandwich Cake. Perfect for birthday parties, family gatherings, or any celebration, this layered dessert features creamy ice cream sandwiches, fluffy whipped topping, and colorful candies. Not only is it a visual delight, but it’s also incredibly easy to make, requiring minimal effort for maximum wow-factor. Get ready to impress your guests with this no-bake dessert that combines all your favorite flavors into one delicious cake!
- Prep Time: 20 minutes
- Cook Time: 1 minute
- Total Time: 21 minutes
- Yield: Serves 12 1x
- Category: Dessert
- Method: No-Bake
- Cuisine: American
Ingredients
- 12 ice cream sandwiches
- 16 ounces whipped topping (thawed)
- 1/2 cup miniature chocolate chips
- 3/4 cup mini M&M's
- 1/3 cup fudge sauce
Instructions
- Arrange 4 ice cream sandwiches in a row on a serving plate.
- Pipe dollops of whipped topping over the sandwiches.
- Sprinkle with chocolate chips and mini M&M's.
- Freeze until firm.
- Repeat layers with remaining ingredients until you have 3 layers each of ice cream sandwiches and toppings. Freeze each layer until firm before adding the next.
- Freeze the assembled cake for at least 1 hour.
- Drizzle fudge sauce on top before slicing and serving.
Nutrition
- Serving Size: 1 slice (114g)
- Calories: 317
- Sugar: 29g
- Sodium: 151mg
- Fat: 13g
- Saturated Fat: 7g
- Unsaturated Fat: 4g
- Trans Fat: 0g
- Carbohydrates: 45g
- Fiber: 1g
- Protein: 4g
- Cholesterol: 16mg